How to Create an Amazon Storefront in 6 Steps (2026)

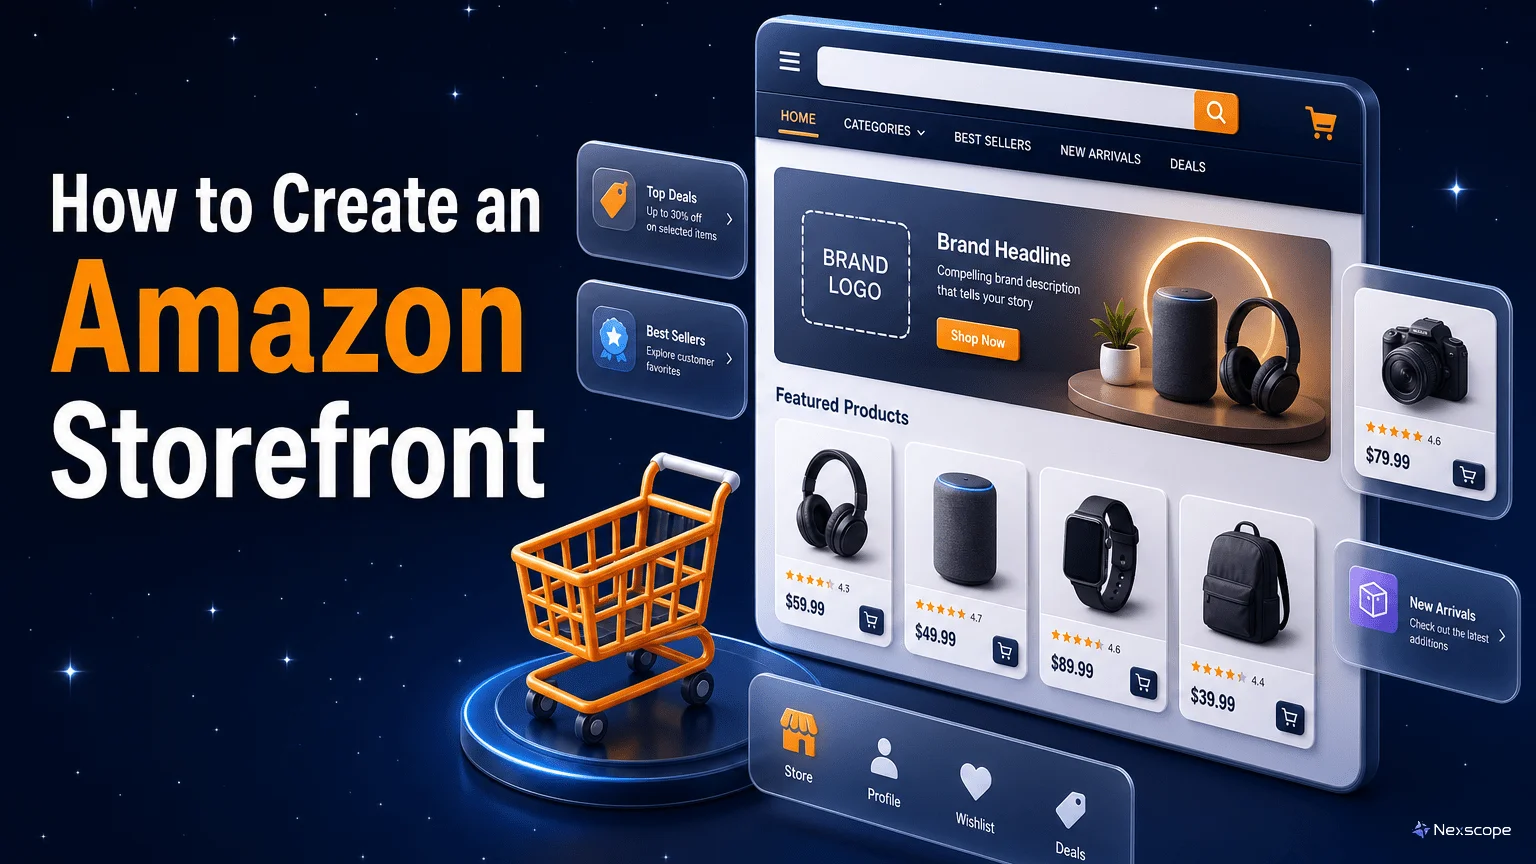
An Amazon storefront gives your brand a dedicated home on the world's largest marketplace. Instead of competing product-by-product in search results, you get a customizable mini-website where customers can browse your entire catalog, learn your brand story, and shop by category.
The difference matters. Brands with storefronts report higher average order values and better customer retention than those relying solely on individual product listings. A storefront turns casual browsers into brand-aware customers who come back.
But creating one isn't as simple as clicking a button. Amazon requires Brand Registry enrollment, which means you need a registered trademark. The setup process involves multiple steps, design decisions, and a review period before your store goes live.
This guide walks through everything: requirements, step-by-step setup, design best practices, and how to drive traffic once your storefront is live.
What Is an Amazon Storefront?
An Amazon storefront (also called Amazon Store or Brand Store) is a dedicated, multi-page shopping destination for your brand within Amazon. Think of it as your own mini-website hosted on Amazon's platform.
Storefront vs. Standard Product Listings
| Feature | Product Listing | Amazon Storefront |
|---|---|---|
| Brand visibility | Competes with other sellers | Dedicated brand space |
| Layout control | Fixed Amazon template | Customizable pages and sections |
| Product organization | Individual listings | Categories, collections, featured products |
| Brand storytelling | Limited to A+ Content | Full pages for brand story, videos, lifestyle images |
| URL | Standard ASIN URL | Custom amazon.com/stores/brandname URL |
| Analytics | Basic sales data | Store Insights dashboard with traffic and sales metrics |
A storefront consolidates your entire product catalog under one branded experience. Customers can browse by category, watch brand videos, and explore your full range without seeing competitor products.
Who Can Create an Amazon Storefront?
Amazon storefronts are available exclusively to brands enrolled in Amazon Brand Registry. This means:
- You need a registered trademark (or pending application in some cases)
- You must be the brand owner or authorized agent
- You need a Professional Seller account ($39.99/month)
Resellers, arbitrage sellers, and those without trademarks cannot create storefronts.
Amazon Storefront Requirements
Before you can create a storefront, three requirements must be in place.
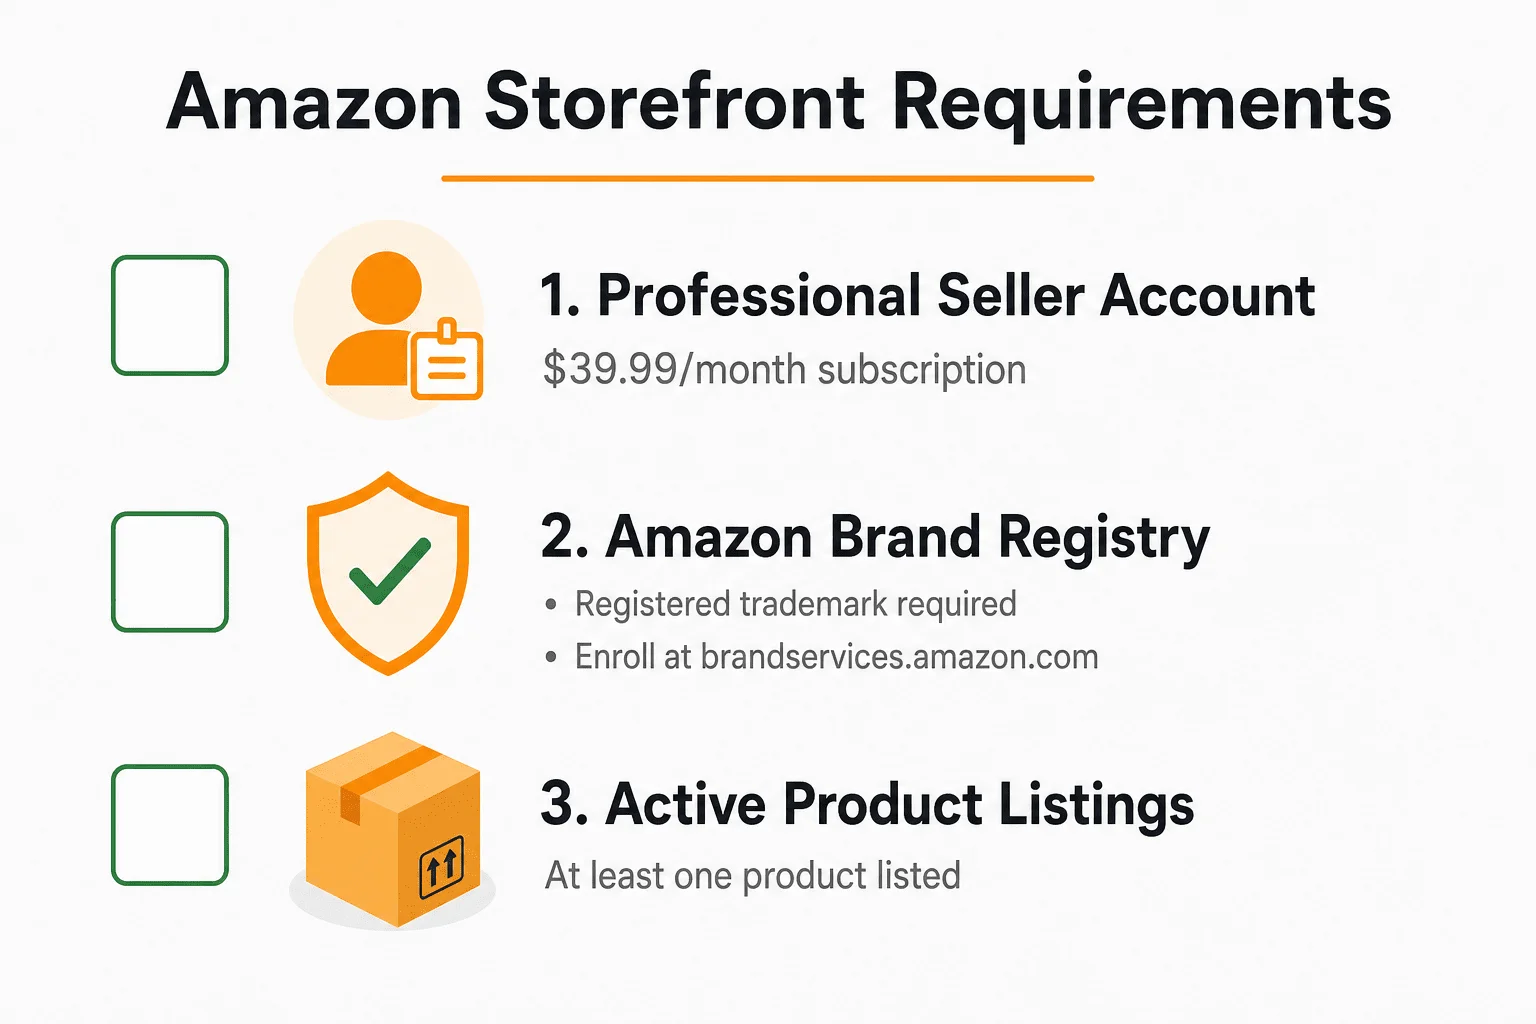
Professional Seller Account
Amazon offers two seller account types:
| Account Type | Monthly Fee | Storefront Access |
|---|---|---|
| Individual | $0 + $0.99/item sold | ❌ No |
| Professional | $39.99/month | ✅ Yes (with Brand Registry) |
If you're currently on an Individual plan, upgrade to Professional through Seller Central before proceeding.
Amazon Brand Registry
Brand Registry is Amazon's program for protecting intellectual property and unlocking brand-building tools. Storefronts are one of the key benefits.
Trademark Requirements
To enroll in Brand Registry, you need:
- Active registered trademark — Text-based or image-based mark containing words, letters, or numbers
- Trademark registration number — From an accepted trademark office (USPTO, EUIPO, UKIPO, etc.)
- Brand name on products — Your trademark must appear on products or packaging
Amazon accepts trademarks from most major countries. Pending trademark applications may qualify through Amazon's IP Accelerator program, but approval isn't guaranteed.
How to Enroll in Brand Registry
- Go to brandservices.amazon.com
- Sign in with your Seller Central credentials
- Click "Enroll a new brand"
- Enter your brand name exactly as it appears on your trademark
- Provide your trademark registration number and issuing office
- Upload images showing your brand name on products or packaging
- List the product categories where your brand sells
- Submit and wait for verification (typically 2-10 business days)
Amazon may send a verification code to the contact listed on your trademark registration. Respond promptly to avoid delays.
Active Product Listings
You need at least one active product listing under your brand before creating a storefront. The storefront pulls products from your existing catalog, so there's nothing to display if you haven't listed anything yet.
How to Create an Amazon Storefront (Step by Step)
Once you meet the requirements, follow these six steps to build your storefront.
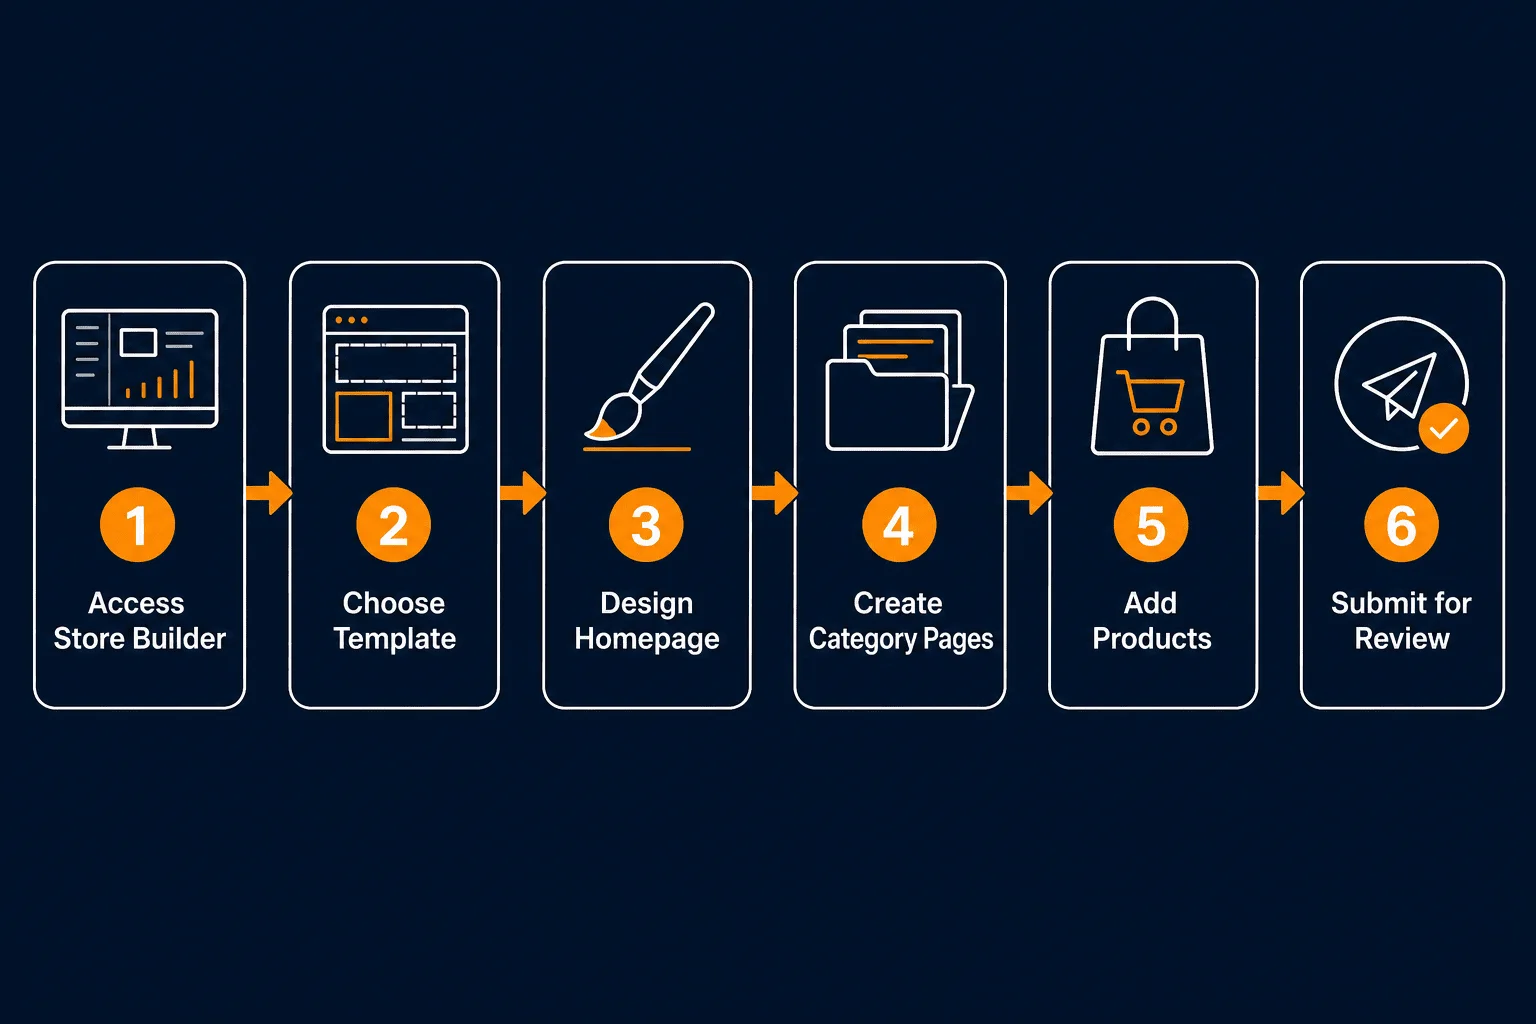
Step 1: Access the Store Builder
- Log in to Seller Central
- Hover over Stores in the main navigation
- Click Manage Stores
- Select Create Store
- Choose your brand from the dropdown (only Brand Registry-enrolled brands appear)
You'll land in Amazon's Store Builder, a drag-and-drop interface for designing your storefront.
Step 2: Choose a Template or Build from Scratch
Amazon offers three starting options:
| Template | Best For |
|---|---|
| Marquee | Brands with strong hero imagery and a few key products |
| Product Highlight | Brands wanting to feature specific products prominently |
| Product Grid | Brands with large catalogs needing organized category display |
Alternatively, select Blank to start from scratch with full layout control.
For most sellers, starting with a template and customizing is faster than building from zero. You can always restructure later.
Step 3: Design Your Homepage
Your homepage is the first impression. Key elements to include:
Hero Image and Brand Logo
- Hero image: 3000 x 600 pixels minimum, lifestyle imagery showing your products in use
- Brand logo: 400 x 400 pixels, PNG with transparent background preferred
- Headline text: Optional overlay text introducing your brand
The hero section should immediately communicate what your brand sells and who it's for. Avoid generic stock photos—use images featuring your actual products.
Navigation and Categories
Set up your navigation menu to help customers find products quickly. Common structures:
- By product type: "T-Shirts," "Hoodies," "Accessories"
- By use case: "Home Office," "Travel," "Fitness"
- By collection: "New Arrivals," "Best Sellers," "Sale"
Keep navigation to 5-7 categories maximum. Too many options create decision paralysis.
Step 4: Create Category Pages
Each navigation item needs a corresponding page. For each category page:
- Click Add page in the Store Builder
- Name the page (this appears in navigation)
- Choose a layout template or build custom
- Add content tiles: product grids, images, videos, text
Category pages should focus on helping customers find the right product. Use:
- Product grids showing all items in that category
- Comparison charts for products with multiple variants
- Lifestyle images showing products in context
Step 5: Add Products and Content
Populate your pages with content tiles:
| Tile Type | Use Case |
|---|---|
| Product Grid | Display multiple products in a browsable format |
| Image with Text | Brand storytelling, feature highlights |
| Video | Product demos, brand story, how-to content |
| Shoppable Image | Lifestyle image with clickable product hotspots |
| Best Sellers | Auto-populated grid of top-selling products |
For each product tile, select ASINs from your catalog. Products must be active and in stock to display.
💡 Pro Tip: Include at least one video on your storefront. According to Amazon, stores with video content see 5-10% higher engagement than those without.
Step 6: Submit for Review
Before your storefront goes live:
- Click Preview to check desktop and mobile views
- Fix any layout issues, broken images, or empty sections
- Click Submit for publishing
Amazon reviews all storefronts before they go live. The review typically takes 24-72 hours. Common rejection reasons:
- Images with external URLs or competitor mentions
- Pricing claims ("lowest price," "best deal")
- Unsubstantiated claims ("#1 rated," "clinically proven" without evidence)
- Poor image quality or broken layouts
If rejected, Amazon provides feedback. Make corrections and resubmit.
Amazon Storefront Design Best Practices
A functional storefront is good. A well-designed storefront converts significantly better.
Use High-Quality Images and Videos
Amazon recommends these specifications:
| Asset | Minimum Size | Recommended |
|---|---|---|
| Hero image | 3000 x 600 px | 3000 x 1200 px |
| Product images | 1000 x 1000 px | 2000 x 2000 px |
| Logo | 400 x 400 px | 600 x 600 px (PNG) |
| Video | 1280 x 720 px | 1920 x 1080 px |
Avoid text-heavy images. Amazon's mobile view can make small text illegible.
Organize Products into Logical Categories
Structure your catalog the way customers think, not the way your inventory system is organized.
❌ Poor structure: - SKU-12345 Collection - 2024 Products - Miscellaneous
✅ Better structure: - Kitchen Tools - Outdoor Gear - Gift Sets
Use customer language. If customers search for "coffee mugs" don't label your category "ceramic drinkware."
Tell Your Brand Story
Dedicate at least one section (or page) to brand storytelling:
- Origin story: Why you started, what problem you solve
- Values: Sustainability, quality, craftsmanship
- Social proof: Press mentions, awards, customer count
Brand story content doesn't directly sell products but builds trust that improves conversion across your entire catalog.
Optimize for Mobile
Over 60% of Amazon traffic comes from mobile devices. Always:
- Preview your store on mobile before publishing
- Use large, tappable buttons
- Keep text blocks short
- Ensure images scale properly
- Test all shoppable image hotspots on touch screens
How to Drive Traffic to Your Amazon Storefront
A storefront with no visitors generates no sales. Here's how to get traffic.
Amazon PPC (Sponsored Brands)
Sponsored Brands ads can link directly to your storefront instead of a product page. This is ideal for:
- Brand awareness campaigns
- Showcasing product range
- Capturing branded search traffic
Set up Sponsored Brands campaigns in Amazon Ads console. Target your brand name, category keywords, and competitor brand names.
For detailed PPC strategy, see our guide on Amazon PPC optimization.
Social Media and External Traffic
Your storefront has a shareable URL: amazon.com/stores/yourbrandname
Use this link in:
- Instagram bio and stories
- TikTok profile and video descriptions
- Email newsletters
- Influencer partnerships
- QR codes on packaging
Amazon Attribution lets you track external traffic sources. Create unique tags for each channel to measure which drives the most sales.
Amazon Posts
Amazon Posts is a free social media-style feed for brands. Posts appear on product detail pages, related posts feeds, and your storefront.
To use Posts:
- Go to posts.amazon.com
- Sign in with your Seller Central credentials
- Create posts with lifestyle images and captions
- Link each post to relevant products
Posts build organic visibility over time and drive traffic to both product pages and your storefront.
Common Mistakes to Avoid
Mistake 1: Copying Competitor Storefronts
Amazon can reject stores that look too similar to competitors or use similar creative assets. Design for your brand, not theirs.
Mistake 2: Ignoring Mobile Experience
What looks great on desktop may be unusable on mobile. Always preview and test on actual mobile devices before publishing.
Mistake 3: Too Many Categories
More categories doesn't mean better organization. Customers get overwhelmed when facing 15+ navigation options. Consolidate into 5-7 clear categories.
Mistake 4: Neglecting Store Insights
Amazon provides analytics showing page views, visitors, sales, and traffic sources. Check Store Insights monthly and optimize underperforming pages.
Mistake 5: Set and Forget
Storefronts need maintenance. Update for:
- New product launches
- Seasonal promotions
- Out-of-stock products
- Refreshed brand imagery
A stale storefront with discontinued products damages brand perception.
Conclusion
An Amazon storefront transforms your brand from a collection of individual listings into a cohesive shopping destination. Customers can browse your full catalog, understand your brand story, and shop with confidence—all without seeing competitor products.
The setup requires investment: Brand Registry enrollment, trademark registration, and time designing pages. But the payoff—higher average order values, better brand recognition, and a defensible presence on Amazon—makes it worthwhile for any serious brand.
Start with the requirements: Professional Seller account, Brand Registry, and active listings. Then follow the six steps to build, design, and launch your storefront. Once live, drive traffic through Sponsored Brands, external marketing, and Amazon Posts.
Your storefront is your brand's home on Amazon. Build it right.
Find Products and Optimize Listings with an AI Agent
Building an Amazon storefront is just the beginning. Deciding which products to feature, how to organize categories, and what keywords to target requires ongoing research.
Nexscope is an AI agent that handles e-commerce research through conversation. It pulls data directly from Amazon, Google Trends, and competitor analysis tools—so you're working with accurate, real-time numbers instead of estimates.

- "Which of my products should I feature on my storefront homepage?"
- "What keywords are my competitors ranking for?"
- "Analyze the top storefronts in my category"
- "Find gaps in my product catalog"
Choose from specialized roles—Product Researcher, Competitor Analyst, Listing Optimizer—or switch between AI models (Claude, GPT, Gemini) to match your task.
Instead of manually researching competitors and guessing what works, you ask questions and get actionable insights backed by real marketplace data.
Have questions? Join our Discord
Connect with other e-commerce sellers, get help with storefront optimization, and stay updated on new features.
Start selling smarter today
AI-powered insights to launch and grow your ecommerce business
Get Started Free →Frequently Asked Questions
Do I need Brand Registry to create an Amazon storefront?
Yes. Amazon storefronts are exclusively available to brands enrolled in Amazon Brand Registry. This requires a registered trademark (or pending application through IP Accelerator). Resellers and arbitrage sellers without trademarks cannot create storefronts.
How much does an Amazon storefront cost?
Creating an Amazon storefront is free—there's no additional fee beyond your Professional Seller subscription ($39.99/month). However, you'll need to invest in Brand Registry (free but requires a trademark) and potentially professional photography or design services for optimal results.
How long does it take to get a storefront approved?
Amazon typically reviews and approves storefronts within 24-72 hours. Complex stores or those with policy issues may take longer. If rejected, Amazon provides specific feedback so you can correct issues and resubmit.
Can I create a storefront without a trademark?
Not directly. Brand Registry requires a trademark from an accepted trademark office. However, Amazon's IP Accelerator program connects sellers with vetted law firms to file trademark applications, and pending applications may qualify for Brand Registry before full registration completes.
What's the difference between an Amazon storefront and a product listing?
A product listing is a single page for one product, competing alongside similar products from other sellers. An Amazon storefront is a multi-page branded destination showcasing your entire catalog with custom layouts, brand story content, and no competitor products visible. Storefronts are for brand building; listings are for individual product sales.
How do I track my storefront performance?
Amazon provides Store Insights, accessible through Seller Central under Stores > Manage Stores > Insights. Metrics include page views, visitors, sales, units sold, and traffic sources. Use this data to identify top-performing pages and optimize underperforming sections.
Can I have multiple storefronts for different brands?
Yes. If you own multiple brands with separate Brand Registry enrollments, you can create a distinct storefront for each brand. Each storefront operates independently with its own design, products, and analytics.
Sources
- Amazon. (2026). Build Your Brand with Amazon Stores. Retrieved from advertising.amazon.com
- Amazon. (2026). Amazon Brand Registry Requirements. Retrieved from brandservices.amazon.com
- Amazon. (2026). Store Builder Help Documentation. Retrieved from sellercentral.amazon.com