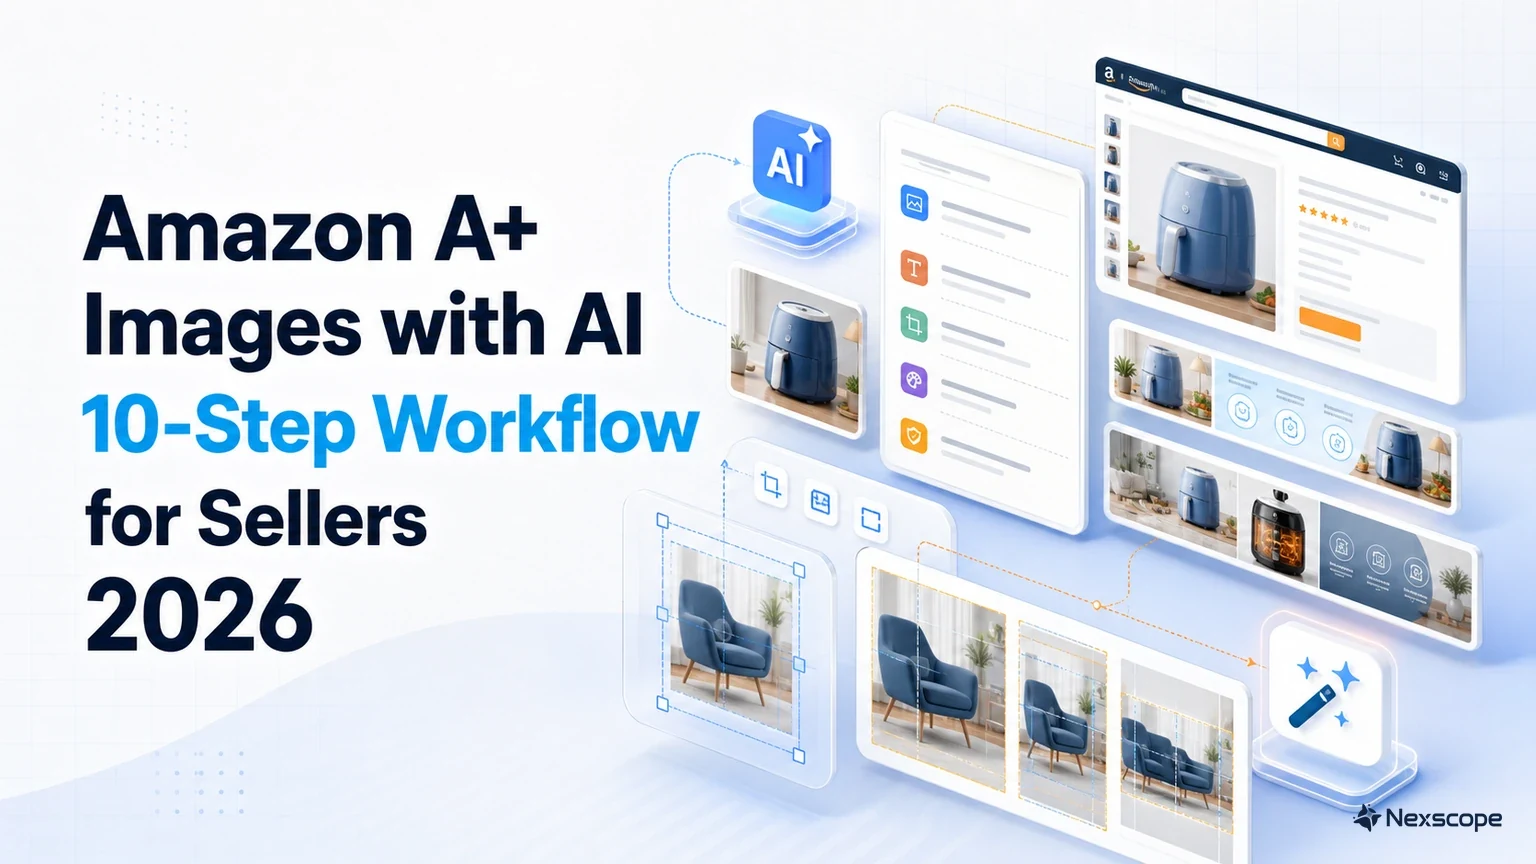
Amazon A+ Images with AI: 10-Step Workflow for Sellers 2026

Amazon A+ images with AI work best when the workflow starts with real product facts, real product photos, and a clear visual strategy. The goal is not to ask an image model to invent a better product. The goal is to turn verified selling points into listing-ready visuals that shoppers can understand quickly.
For ecommerce teams, the old image workflow is slow. Operations teams collect bullet points, competitor screenshots, product dimensions, and brand notes. Designers translate those materials into concepts, ask follow-up questions, and revise the same image set several times. When the same product needs secondary images, A+ desktop modules, A+ mobile layouts, Shopify PDP images, and ad creatives, the workload grows fast.
A better workflow uses an ecommerce AI agent such as Nexscope AI Agent, Codex, Claude Code, or another structured AI workspace to separate planning from image generation. First, the agent reads the product folder, researches the market, and proposes the visual plan. After the seller approves the direction, it turns each image into a detailed prompt, layout brief, claim checklist, and export size. Then an AI image tool can generate or edit images with much less guesswork.
Step 1: Start With Real Product Photos for the Main Image
The first rule is simple: Amazon main images should be based on the real product, not a fictional AI render. The main image appears in search results and on the product detail page. It needs to be clear, accurate, compliant, and recognizable.
AI can help inspect the main image, improve the workflow around it, and create supporting assets. It should not make up a new version of the product, add accessories that are not included, exaggerate size, or show packaging that does not exist.
Use AI Differently for Main Images, Secondary Images, and A+ Content
| Visual task | What AI can help with | What the seller must verify |
|---|---|---|
| Main image | Check white background, product crop, clarity, visible accessories, and image policy risks | Product appearance, included items, packaging, and factual accuracy |
| Secondary images | Turn bullet points into lifestyle scenes, feature callouts, size charts, comparison images, and usage steps | Claims, certifications, measurements, comparisons, and category restrictions |
| A+ content | Plan brand story, problem scenes, product structure, use cases, detail images, and mobile-friendly modules | Brand tone, legal claims, upload dimensions, and marketplace compliance |
| PDP and ad creatives | Adapt the same visual logic for Shopify, TikTok Shop, Walmart, DTC pages, and social ads | Platform rules, audience fit, and final creative quality |
This is why a good AI image workflow should behave less like a random art generator and more like a visual planning assistant that understands ecommerce conversion.
Step 2: Set the Workflow Before Generating Images
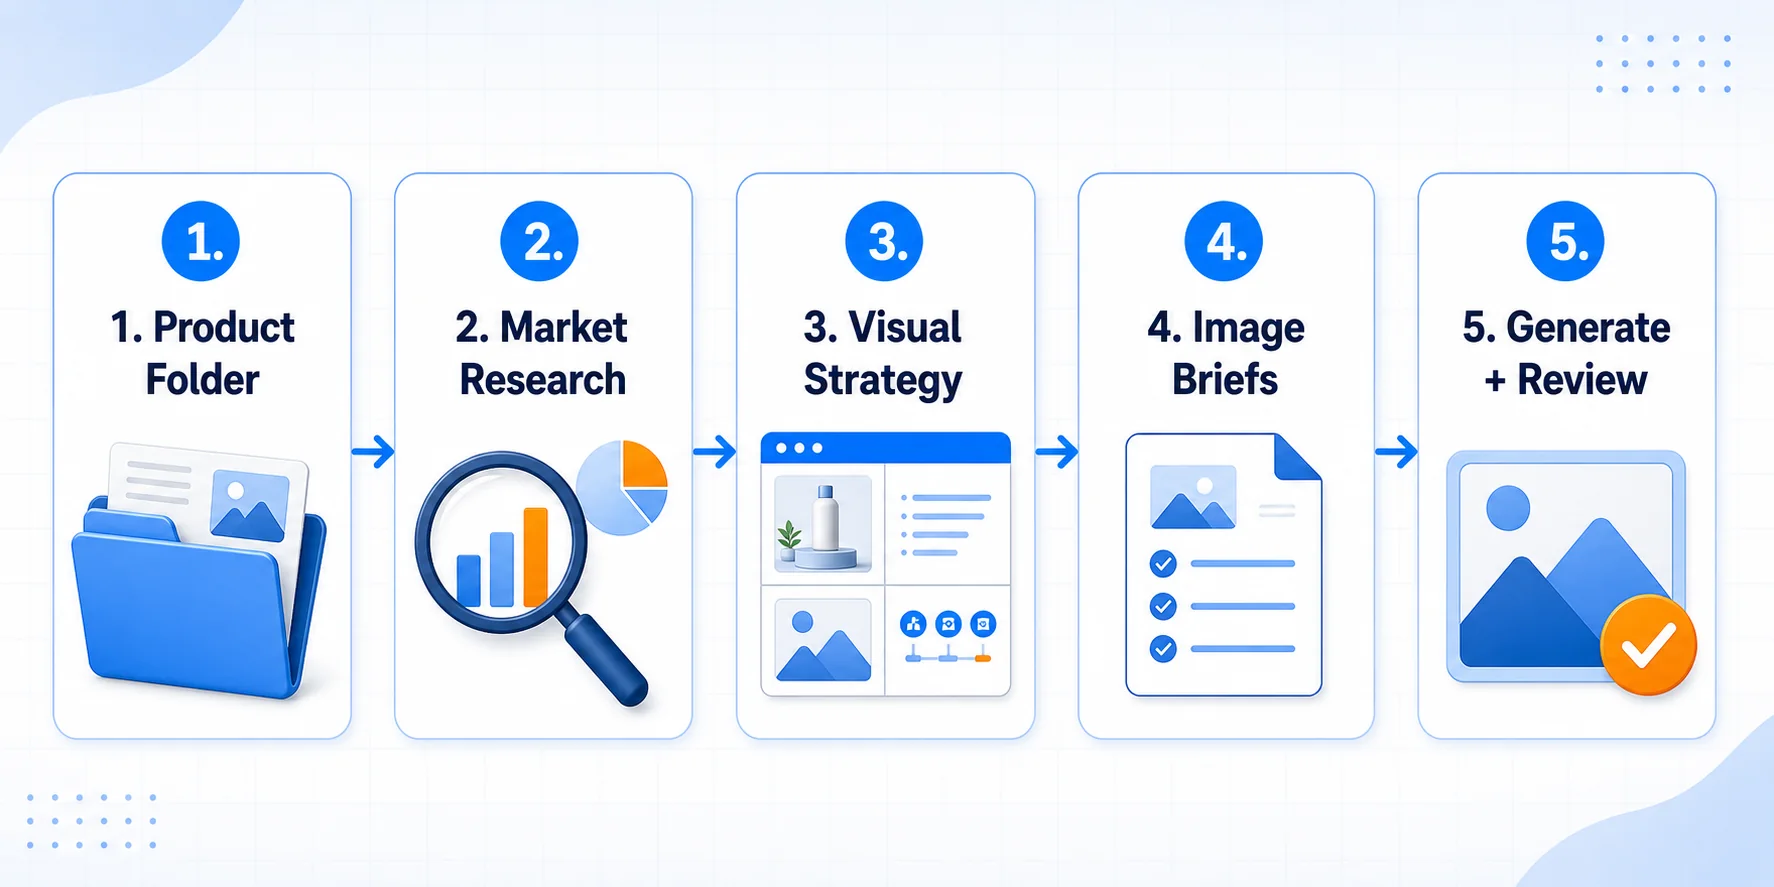
The workflow has five major stages:
- Read the product folder.
- Research the market, competitors, image patterns, reviews, and compliance risks.
- Produce a draft visual strategy for seller approval.
- Convert the approved strategy into structured image briefs.
- Generate, crop, export, and review the final image set.
The key design choice is the approval gate between strategy and generation. The AI agent should not generate 20 images before the seller confirms the message, image order, claims, and creative direction.
That approval gate prevents a common failure: beautiful images built on the wrong selling angle. If the second image should focus on installation but the AI chooses lifestyle usage, every later prompt becomes weaker. If the A+ desktop layout is approved before generation, the output becomes easier to inspect and reuse.
Add a Seller Approval Step Before Image Generation
For Amazon images, the expensive mistake is not a bad prompt. The expensive mistake is a wrong visual strategy. Sellers need to confirm:
- Which buying objections each image should remove
- Which product facts are verified
- Which claims should be avoided
- Which audience and use case should drive the scene
- Whether the style fits the brand position
- Whether mobile shoppers can read the image quickly
Once those decisions are approved, image generation becomes execution rather than guessing.
Step 3: Prepare One Product Folder
The input can be simple. Create one product folder and put the core materials inside it.
| Material | What to include | Why it matters |
|---|---|---|
| Product information | Current title, bullet points, description, selling points, target audience, use cases, dimensions, materials, and verified claims | Gives the AI agent the product facts it must follow |
| White-background images | Front, side, detail, packaging, and accessory photos when available | Keeps the main product accurate instead of invented |
| Brand assets | Logo, brand colors, typography notes, tone, and visual references | Keeps the image set aligned with the brand |
| Creative requirements | Marketplace, image types, output sizes, language, style, and forbidden claims | Sets the rules before image planning begins |
The seller provides product facts. The AI agent translates those facts into visual selling language.
Include the Product Facts AI Must Follow
The most important file is product_info.md. It should include:
- Product title
- Current bullet points
- Product description
- Main selling points
- Target audience
- Use cases
- Materials, dimensions, and included accessories
- Verified certifications or test results
- Claims that should not be used
- Marketplace and category notes
If the listing is already live, the current title, bullet points, description, and image notes can be copied into this file. The AI agent can organize them before planning visuals.
Define the Marketplace, Style, and Claims Up Front
The requirements.md file should define the output scope:
- Marketplace: Amazon, TikTok Shop, Shopify, Walmart, or DTC
- Asset types: main image review, secondary images, A+ desktop, A+ mobile, PDP images, ads
- Language and market: US English, UK English, German, French, Spanish, or another market
- Brand style: premium, practical, minimalist, family-friendly, technical, or value-driven
- Forbidden claims: medical, eco, safety, performance, durability, or comparison claims without proof
This keeps the workflow grounded. AI is powerful, but it needs boundaries.
Step 4: Research Customer Doubts Before Making Images
Images are not just decorations. A strong Amazon image set answers the questions that stop shoppers from buying.
Before generating anything, the AI agent should research five areas.
| Research area | What the AI should extract |
|---|---|
| Market basics | Common price bands, feature language, category image styles, and dominant selling points |
| Target audience | Who buys the product, why they buy it, and what situation triggers the purchase |
| Competitor images | Which visual angles competitors use, which images are effective, and which messages are repeated too often |
| Review pain points | Complaints, confusion, missing information, setup issues, sizing problems, and quality concerns |
| Compliance boundaries | Words, certifications, health claims, environmental claims, and performance statements that need proof |
For example, a kitchen organizer should not be reduced to "saves space" and "easy to install." After research, the image plan can become more specific:
- A messy countertop scene becomes a before-and-after visual.
- Renters who avoid drilling become a no-damage installation scene.
- Buyers who worry about load capacity need a structure and support explanation, backed by proof.
- Shoppers who cannot imagine scale need a size reference in a realistic kitchen.
That is the real job of the workflow: turn purchase resistance into visual proof.
Use Nexscope for Product Research and Creative Direction
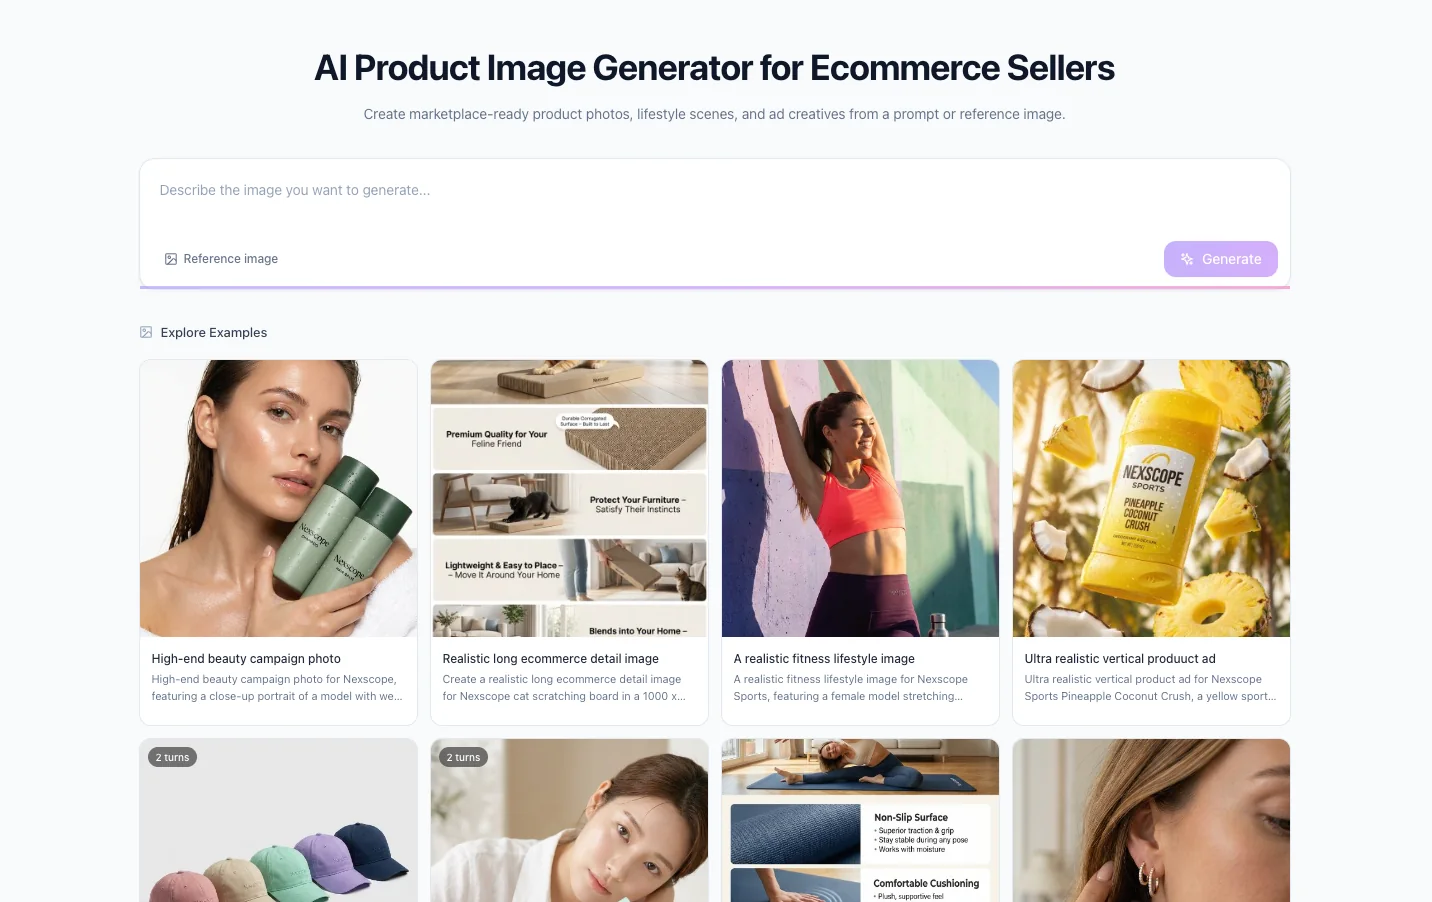
Nexscope helps ecommerce sellers move from product research to image planning inside one AI-powered workflow. For sellers who want to create product visuals directly, the AI Product Image Generator can support listing images, lifestyle scenes, product concept visuals, and ad creatives.
The best results still come from verified inputs. Real white-background product photos, brand assets, and clear claims create a stronger foundation than asking any AI image model to guess the product.
Step 5: Create the Image Plan Before Generating Visuals
The first output should be a strategy document, not images.
This strategy should show the seller what each image is supposed to accomplish. A standard Amazon visual plan can look like this:
| Module | Recommended direction |
|---|---|
| Main image check | White background, crop, clarity, no added text, no unsupported props |
| Secondary image 1 | Core benefit image that explains the main value in one glance |
| Secondary image 2 | Pain-point scene that shows why the shopper needs the product |
| Secondary image 3 | Feature breakdown with structure, materials, or mechanism |
| Secondary image 4 | Size, compatibility, or fit guide to reduce wrong purchases |
| Secondary image 5 | How-to-use steps that lower setup anxiety |
| Secondary image 6 | Package contents or accessory explanation to reduce returns |
| A+ module 1 | Brand opening or hero scene |
| A+ module 2 | Problem and lifestyle context |
| A+ module 3 | Core technology, material, or design logic |
| A+ module 4 | Detail close-ups and benefit callouts |
| A+ module 5 | Use cases or buyer segments |
| A+ module 6 | Comparison or decision support |
| A+ module 7 | Brand promise, support, or final confidence builder |
This is the point where the seller should intervene. The AI agent does not know whether a supplier can prove a specific claim. It does not know whether the brand wants to feel premium or affordable unless the seller says so. It can infer a direction, but the seller must approve the direction.
Approve the Message, Claim, and Scene for Each Image
Before the workflow continues, approve or revise:
- Image order
- Main message for each image
- Claims and numbers
- Target audience
- Use cases
- Visual style
- Product angles and source images
- A+ desktop and mobile structure
If one image feels repetitive, remove it. If a feature needs proof, mark it as proof-required. If a scene does not match the market, rewrite it before generation begins.
Step 6: Turn the Approved Plan Into Structured Image Briefs
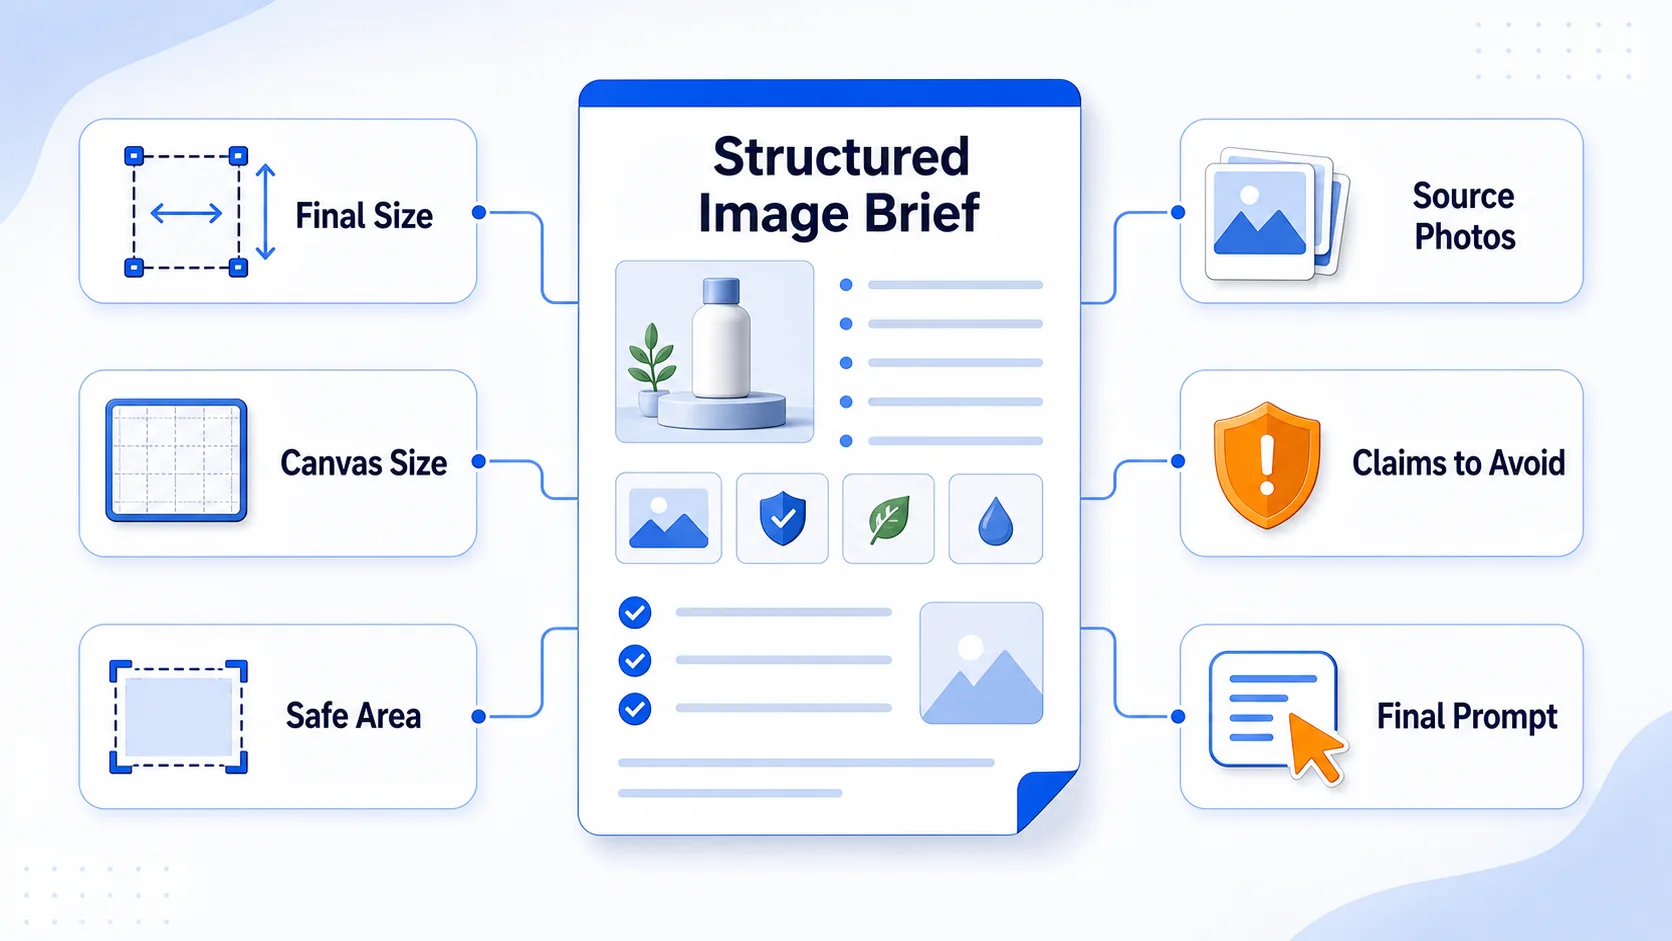
After the seller confirms the strategy, the AI agent can turn the plan into a structured image brief.
This matters because a complete listing image package is not one image. A seller may need six secondary images, seven A+ desktop modules, seven A+ mobile modules, PDP images, and ad variants. Natural language alone can miss dimensions, titles, source images, safe areas, icon labels, and crop rules.
The structured brief turns the image workflow into a checklist that can be reviewed, edited, reused, and generated in batches.
| Brief field | Example for a kitchen organizer image |
|---|---|
| Asset ID | Secondary image 1 |
| Asset type | Amazon secondary image |
| Final upload size | 1200 x 1600 |
| Generation canvas | 1200 x 1600 or a nearby model-friendly size |
| Safe area | Keep key text and product details inside the center area |
| Source product images | Front white-background product photo |
| Visual goal | Explain the core benefit in one glance |
| Headline | More Space, Less Mess |
| Supporting text | Organize your kitchen in minutes |
| Icon labels | No drilling, strong hold, easy clean |
| Scene | Bright modern kitchen countertop |
| Composition | Product on the right, before-and-after scene on the left, icons near the bottom |
| Claims to avoid | Any unverified load capacity or certification |
| Image prompt | A final generation instruction based on the approved brief |
Include the Details Each Image Needs
- id identifies the asset and keeps exports organized.
- asset_type separates secondary images, A+ desktop modules, A+ mobile modules, PDP images, and ads.
- final_size defines the required upload size.
- generation_size defines the canvas used by the image model.
- safe_area protects important text and product details from crop loss.
- source_product_images tells the model or editor which real product images to reference.
- visual_goal explains the conversion purpose of the image.
- headline and subheadline define the image text before generation.
- icon_labels keep feature callouts short and readable.
- scene and composition guide the layout.
- claims_to_avoid protects the seller from unsupported statements.
- prompt becomes the final instruction for the image model.
This structure also makes revisions easier. If the seller wants secondary image 2 to change from a kitchen scene to a camping scene, the agent can update one object instead of rewriting the entire plan.
Step 7: Set Upload Sizes Before Sending Images to Amazon
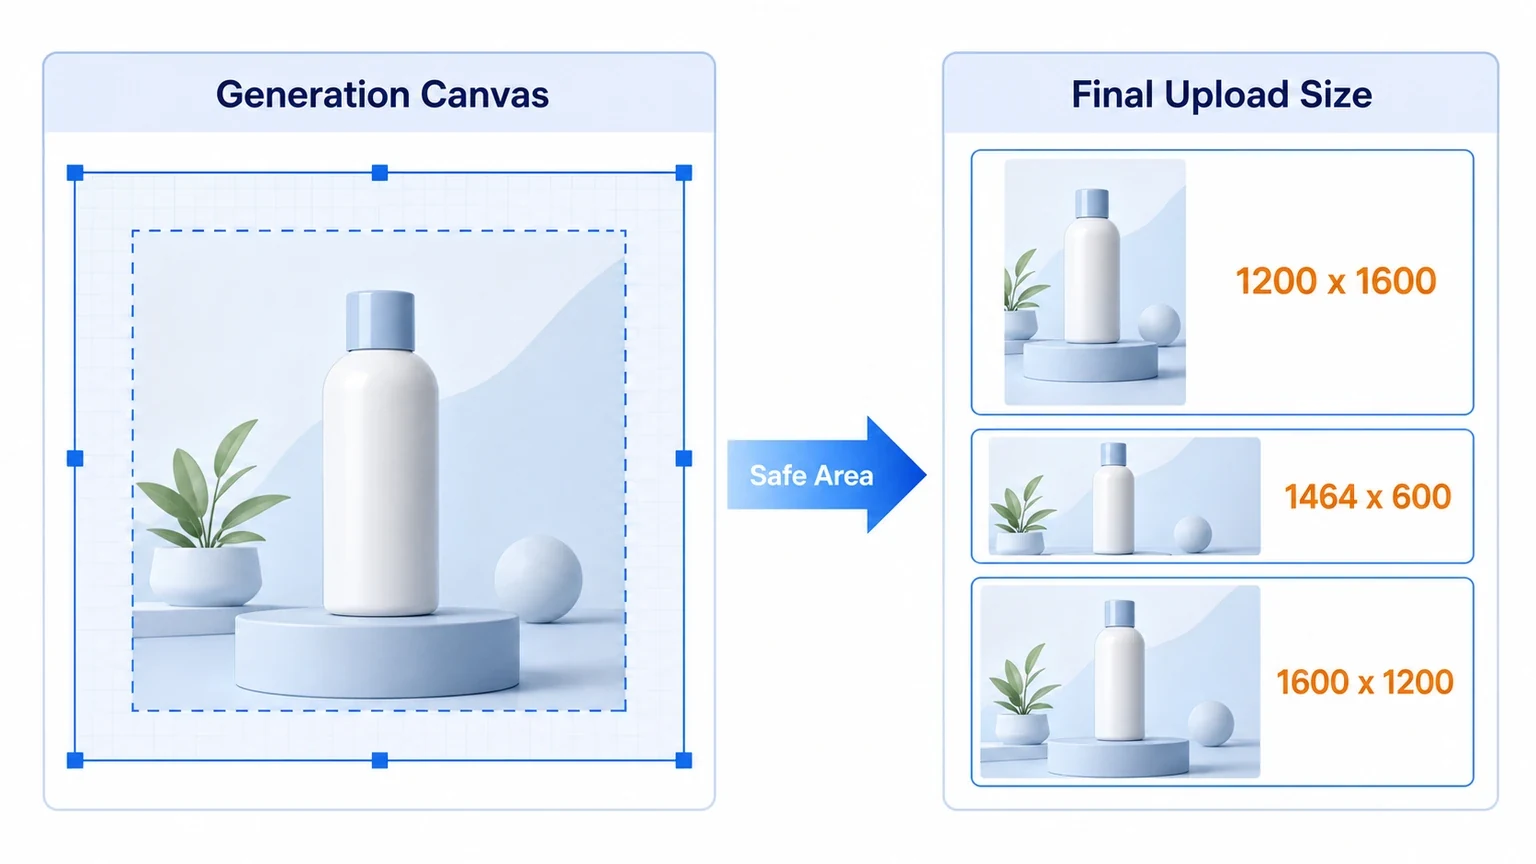
Size handling looks boring until it breaks the workflow.
A seller may want final outputs like:
- Secondary images: 1200 x 1600
- A+ desktop modules: 1464 x 600
- A+ mobile modules: 1600 x 1200
Secondary images and mobile modules are usually easier to manage. A+ desktop images can be trickier because the final upload dimension may not be ideal for direct model generation. Some image systems work better with certain aspect ratios or dimension multiples. A canvas that is perfect for Amazon upload may not be the best canvas for the model.
The final upload size and the model generation canvas should be managed separately.
One practical approach is:
- Generate on a nearby model-friendly canvas.
- Keep important text and product details inside a safe area.
- Crop or resize locally to the final Amazon module size.
- Review the exported image on desktop and mobile.
For example, an A+ desktop module can be generated on a larger nearby canvas and then finalized to 1464 x 600 after the composition is stable. The seller does not need to care about the technical script. The important decision is to keep the message inside a safe area so the final crop does not cut off text, product details, or callouts.
The exact helper script can vary by team. The principle stays the same: plan for generation, then export for marketplace requirements.
Step 8: Use Each Image to Answer One Buying Doubt
Many teams overfocus on the image model. They ask which model is best, which quality setting to use, and which prompt style creates the cleanest output.
Those settings matter. But Amazon images usually fail earlier than the model stage.
The important questions are:
- Which buying doubt does this image solve?
- Does this image repeat information from a previous image?
- Is there too much text for mobile shoppers?
- Is the product shown accurately?
- Are the claims supported by real evidence?
- Does the A+ mobile version need a different layout from desktop?
- Can a shopper understand the message in two seconds?
If these questions are not answered, a stronger model only creates a better-looking weak image.
Keep AI Creative, but Keep Claims Verified
AI can help create a polished lifestyle scene, a clean diagram, or a stronger layout. It should not decide that a product is "medical grade," "eco-certified," "holds 50 pounds," "clinically proven," or "FDA approved" unless the seller provides proof.
For ecommerce product visuals, the safest rule is: AI can improve expression, but the seller owns the facts.
Step 9: Generate the Image Set With Nexscope, Codex, or Another AI Tool
The workflow can be implemented as a Codex Skill, a structured prompt system, an internal creative pipeline, or a guided image generation process. The important part is the order of operations.
A practical setup should tell the AI agent to do four things:
- Read the product information, white-background photos, brand assets, and creative requirements.
- Research the market, audience, usage scenes, competitor image patterns, review pain points, and compliance risks.
- Output only the draft visual strategy first, then wait for seller approval.
- After approval, create the detailed image briefs, generate or edit the images, export them to the required sizes, and flag any unsupported claims.
To start a project, the seller can simply ask the AI agent to plan Amazon secondary images and A+ content for the product folder, with one clear rule: do not generate images until the draft strategy is approved.
If the direction is right, the seller can approve the plan and ask the agent to continue with detailed image briefs and generation. If the direction is wrong, the seller should revise the strategy before any image is generated. For example, secondary image 2 can move from a kitchen use case to a camping use case, or an A+ module can shift from material details to installation steps.
Use Nexscope When Sellers Need Images Faster
Sellers who want to create ecommerce visuals directly can use the AI Product Image Generator for product concepts, listing visuals, lifestyle scenes, and ad creatives. The workflow above still applies: start with product facts, approve the creative direction, then generate.
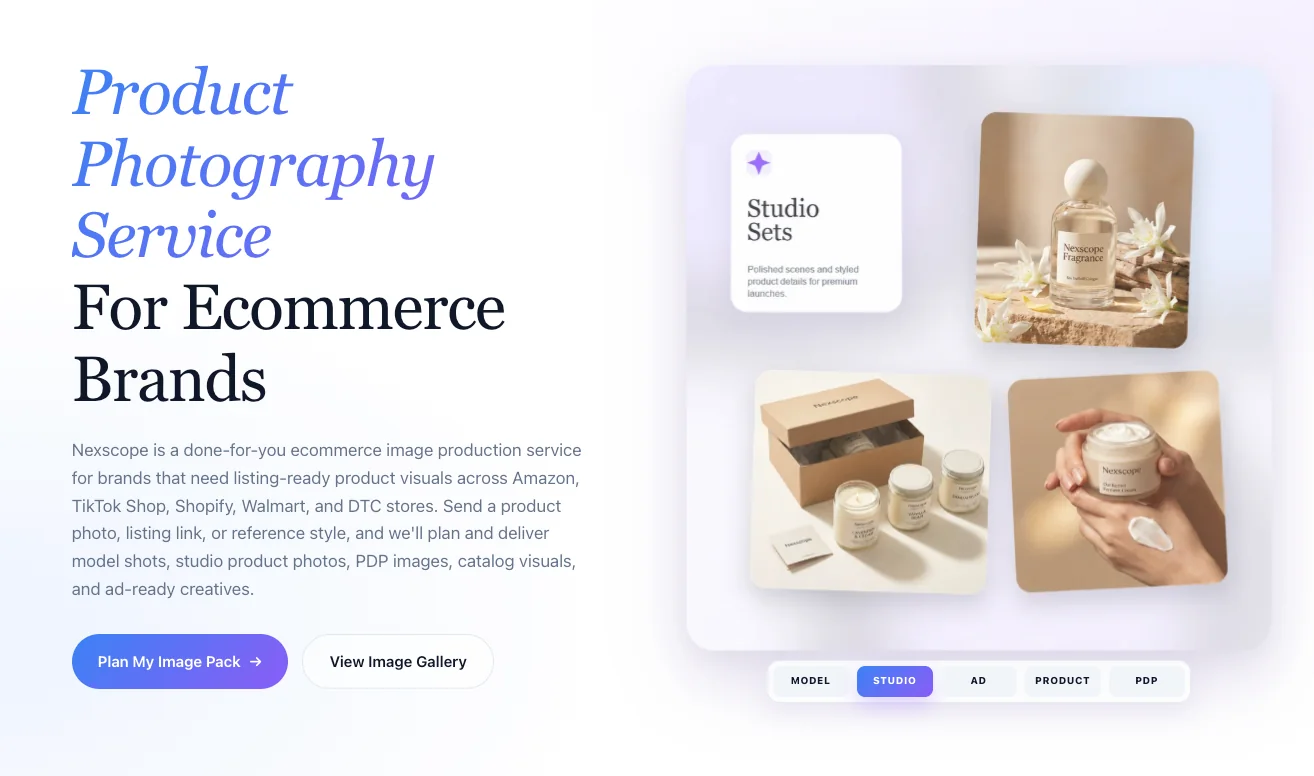
Teams that need polished, listing-ready assets without building the workflow themselves can use Nexscope's Product Photography Service for model shots, studio product photos, PDP images, lifestyle scenes, catalog visuals, and ad-ready creatives.
Need Listing-Ready Product Images?
Nexscope Product Photography Service helps ecommerce brands create model shots, studio product photos, PDP images, lifestyle scenes, catalog visuals, and ad-ready creatives.
Plan My Image Pack →Step 10: Review Every Image Before Publishing
AI can speed up planning and first-draft production, but marketplace images are not casual social posts. Before publishing, every image needs a human review.
Check at least these items:
- Product appearance has not changed.
- Product color, shape, texture, and included accessories are accurate.
- English text is spelled correctly.
- Claims about certifications, performance, durability, medical use, safety, sustainability, or capacity are supported.
- Mobile shoppers can read the key message.
- A+ desktop and mobile versions use the correct export sizes.
- The main image follows marketplace image rules.
- The final set does not repeat the same message too many times.
AI research should also be treated as directional unless connected to trusted data sources. For serious market decisions, sellers should still verify search volume, competitor sales signals, keyword demand, advertising data, and category rules with reliable ecommerce data sources.
Common Mistakes to Avoid
- Generating the main product image from scratch: Use real white-background product photos as the base for main image review and editing.
- Skipping the strategy approval gate: Confirm the image order and message before generating assets.
- Putting too much text into secondary images: Mobile shoppers need short headlines and clear visual hierarchy.
- Using unsupported claims: Do not show certifications, capacities, medical results, or eco claims without proof.
- Using the same layout for A+ desktop and mobile: A mobile module often needs a different composition.
- Treating AI output as final: Always inspect product accuracy, text, and platform compliance.
Conclusion
The real shift is not that AI can make product images. The shift is that a seller can now run a structured visual workflow that used to require several tools and multiple handoffs.
The strongest process is simple: collect real product inputs, research the market, create the visual strategy, approve the plan, generate structured image briefs, produce the image set, export to marketplace sizes, and review everything against product facts.
For DIY sellers, the AI Product Image Generator can help turn product facts into listing visuals, lifestyle images, and ad creatives.
For brands that want a more polished done-for-you output, Nexscope's Product Photography Service can create listing-ready model shots, studio photos, PDP images, lifestyle scenes, and ad-ready creatives for Amazon, TikTok Shop, Shopify, Walmart, and DTC stores.
Create Product Images Faster
Generate listing visuals, lifestyle scenes, and ad creatives from product facts, prompts, or reference images.
Try Image Generator →Frequently Asked Questions
Can AI create Amazon main images?
AI can help review, crop, clean up, and prepare main images, but the main image should be based on a real product photo. Amazon main images need to show the actual product accurately. AI should not invent a different product, add accessories that are not included, or create packaging that does not exist.
What is the best use of AI for Amazon secondary images?
The best use is turning verified product facts into clear visual explanations. AI can help plan benefit images, lifestyle scenes, feature breakdowns, size guides, comparison visuals, package contents, and usage steps. The seller still needs to verify every claim, number, certification, and product detail.
Why should the workflow create a visual strategy before generating images?
A visual strategy prevents the AI from producing images in the wrong direction. It defines what each image should communicate, which buying objection it should solve, and what claims should be avoided. Once the seller approves the strategy, generation becomes much easier to control.
Why use structured image briefs?
Structured briefs keep a large image set organized. Each asset can include its title, subtitle, source product image, final size, generation canvas, safe area, crop strategy, claim limits, and final image instruction. This makes revisions easier and helps teams generate secondary images, A+ desktop modules, and A+ mobile modules consistently.
Can the same image be used for A+ desktop and mobile?
Sometimes, but it is often better to design them separately. Desktop A+ modules are wide, while mobile modules are taller and viewed on smaller screens. Text, product position, and callouts may need a different composition so shoppers can read the message quickly.
When should sellers use a done-for-you product photography service?
A done-for-you service is useful when the brand needs polished model shots, studio photos, PDP images, lifestyle scenes, catalog visuals, or ad creatives but does not want to build the full AI workflow internally. It is also helpful when product accuracy, brand style, and marketplace-ready quality matter more than speed alone.
Sources
- Amazon Seller Central. (2026). Product image guide. Retrieved from sellercentral.amazon.com
- Amazon Seller Central. (2026). A+ content guidelines. Retrieved from sellercentral.amazon.com
- OpenAI. (2026). Image generation. Retrieved from developers.openai.com
- OpenAI. (2026). GPT image generation models prompting guide. Retrieved from developers.openai.com